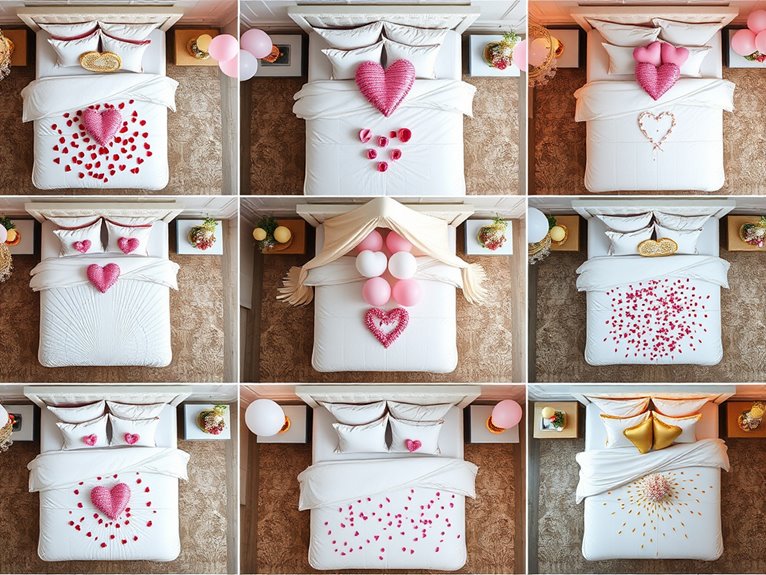
9 Birthday Bed Designs
Like a birthday wish come true, transforming your child’s bed into a magical celebration space creates memories that sparkle long after the party ends. You’ll discover how simple elements like balloons, tulle, and twinkling lights can turn an ordinary bedroom into an enchanted wonderland. From superhero adventures to princess dreams, these nine creative bed designs blend imagination with practicality, offering you inspiration for crafting the perfect birthday surprise that’ll make your little one’s special day truly unforgettable.
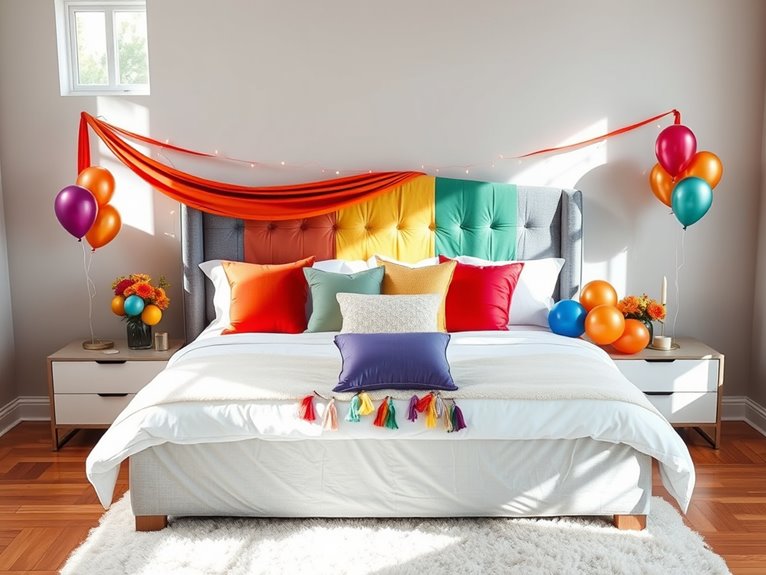
Balloon Canopy Birthday Wonderland
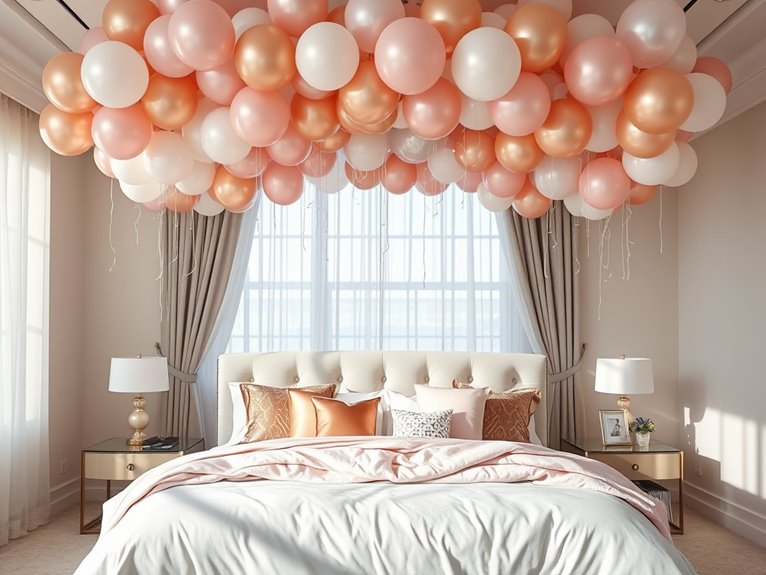
Transform any bed into a magical birthday celebration with a floating canopy of balloons that creates an enchanting wonderland overhead. This whimsical design combines the ethereal nature of suspended balloons with traditional bedding elements, creating a three-dimensional celebration space that makes the birthday person feel completely surrounded by festive energy.
The varying heights and sizes of balloons create visual interest while maintaining an organized, intentional appearance that elevates the look beyond simple party decorations. This styling technique works particularly well for special occasions throughout the year, especially children’s birthdays or milestone celebrations.
The versatility of balloon colors allows this design to complement any existing bedroom décor, while the temporary nature of the installation makes it perfect for creating memorable photo opportunities without permanent commitment. Most effective in rooms with standard-height ceilings, this look can be adapted for both spacious master bedrooms and cozy children’s rooms.
Essential Components:
- Crisp white base bedsheet
- Celebratory duvet cover or comforter
- Decorative throw pillows in party colors
- Clear fishing line or balloon string
- Helium-filled latex balloons (30-50 count)
- Command hooks or removable adhesive strips
- Balloon weights
- Scissors
- Coordinating balloon garland
- LED string lights
- Tulle or gossamer fabric strips
- Birthday-themed accent pillows
How to Achieve This Look
Begin by preparing the bed with crisp, clean linens, starting with a white base sheet and layering with a coordinating duvet cover that complements your chosen balloon color scheme. Create a foundation of comfort with an array of pillows arranged from largest to smallest against the headboard, incorporating birthday-themed accent pillows toward the front of the arrangement.
Install clear Command hooks in a grid pattern across the ceiling, spacing them approximately 12 inches apart. Inflate balloons with helium, varying the ribbon lengths to create depth and dimension. Secure balloons to the hooks, creating a gradient effect with darker colors at the back and lighter shades toward the front.
Weave LED string lights between the balloons to add a magical glow. Create cluster points where balloons gather more densely, particularly around the head of the bed and in the corners. Incorporate tulle or gossamer strips between balloon groupings to soften the overall look and add movement.
Select a color palette that features three main colors plus metallic accents – popular combinations include pink/gold/white, blue/silver/white, or rainbow progressions with coordinating metallic touches.
Pro Styling Tips
Secure balloons the evening before the celebration and slightly overinflate them to account for natural deflation overnight. For smaller rooms, focus the balloon canopy directly over the bed rather than the entire ceiling to prevent overwhelming the space. Create a backup cluster of balloons to refresh any that may deflate during multi-day celebrations.
Consider using high-quality Mylar balloons as anchor points in the design, as they maintain their shape longer than latex alternatives. For daily use, remove the balloon canopy after the celebration but maintain the festive feeling by keeping themed accent pillows and metallic accessories in place for an extended birthday season.
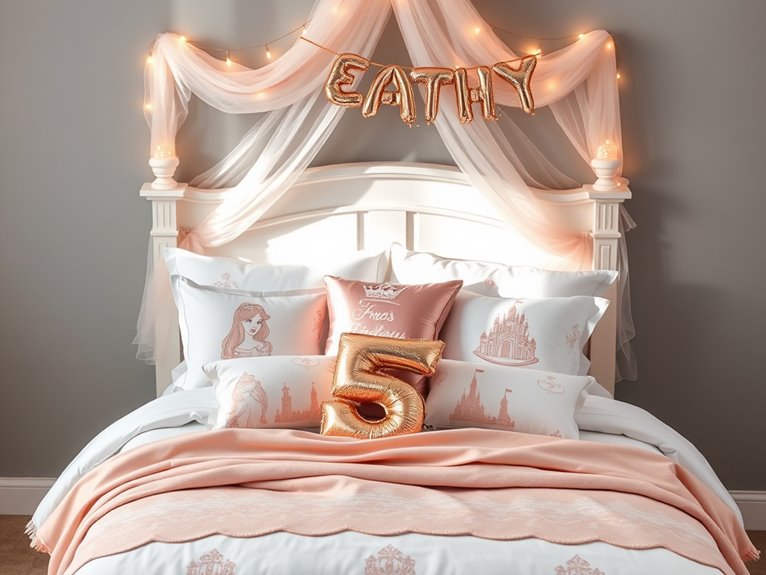
Princess Crown and Tulle Dream Bed
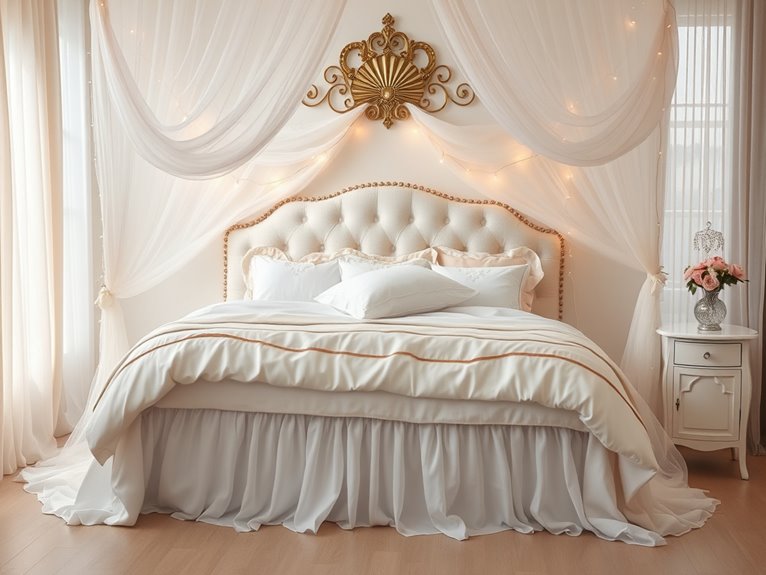
Transform any bed into a magical royal retreat with the Princess Crown and Tulle Dream Bed styling technique. This enchanting design combines delicate tulle draping with a crown-inspired headboard treatment, creating an ethereal canopy effect that instantly elevates the room’s ambiance. The layered fabric creates depth and dimension while soft lighting filtered through the translucent material casts gentle shadows that enhance the dreamy atmosphere.
This styling approach works particularly well for special occasions like birthdays, sleepovers, or any celebration where a touch of whimsy is desired. Perfect for spring and summer seasons, this look complements both modern and traditional bedroom decor, especially in rooms with light, neutral color palettes. The versatile design can be scaled to fit twin through king-size beds and adapted to various ceiling heights.
Essential Components:
- White or pastel tulle fabric (15-20 yards)
- Crown-shaped wall decal or metal crown decoration
- String lights or LED fairy lights
- Sheer curtain rod or ceiling hooks
- White or pastel bedding set
- Decorative pillows in coordinating colors
- Pearl or crystal garlands
- Command hooks or mounting hardware
- Ribbon in complementary colors
- Safety pins and clear fishing line
- Step ladder
How to Achieve This Look
Begin by installing a curved curtain rod or strategically placed ceiling hooks above the bed’s headboard area. Secure the mounting hardware firmly, ensuring it can support the weight of the draped fabric. Create the crown effect by positioning the wall decal or metal crown decoration centrally above the headboard, slightly higher than the curtain rod.
Layer the bed with crisp white or pastel-colored bedding as your foundation. Start with a fitted sheet, followed by a plush comforter or duvet, and finish with a decorative bed skirt that flows to the floor. Position coordinating pillows in varying sizes, creating a gradual cascade from the headboard forward.
Drape the tulle fabric in sweeping curves, starting from the crown centerpiece and flowing outward. Secure the fabric at various points using clear fishing line and hooks to create a billowing effect. Weave string lights through the tulle layers, ensuring even distribution for a subtle sparkle effect. Optimal color combinations include white and silver, blush pink and gold, or lavender and pearl accents.
Pro Styling Tips:
For maximum impact with minimal effort, pre-gather tulle sections using a loose basting stitch before hanging, allowing for easier manipulation and more controlled draping. Scale the crown size proportionally to the bed width – larger beds require bolder crown elements to maintain visual balance.
When adapting for daily use, secure the tulle draping slightly higher and further from the sleeping area to prevent tangling, and consider using flameless battery-operated lights for safety. Regular gentle steaming helps maintain the tulle’s ethereal appearance without damaging the delicate fabric.
Superhero Themed Bedscape
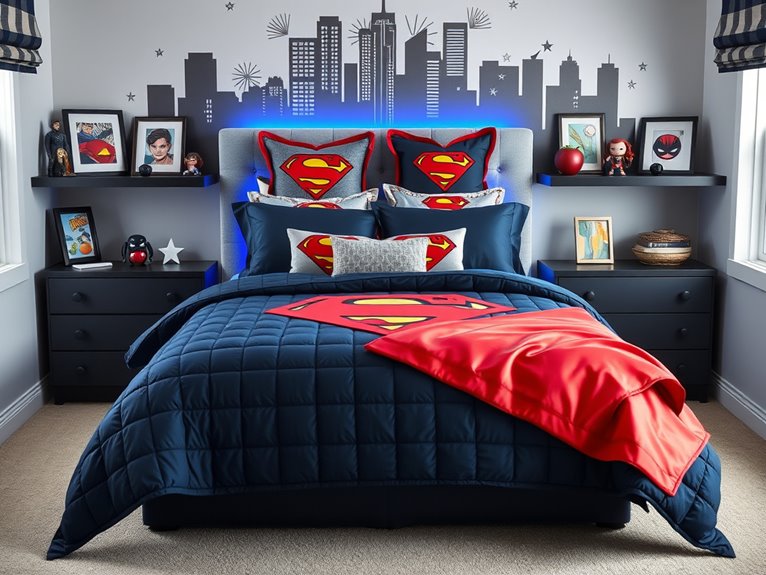
Transform an ordinary bedroom into an epic headquarters with a superhero-themed bedscape that captures the imagination and energy of comic book adventures. Bold colors, dynamic patterns, and iconic superhero symbols create a powerful visual impact that makes the bed the focal point of the room. The layering of different textures and materials, from sleek satin-finish fabrics to textured emblems, adds dimension and creates an immersive experience that brings favorite superhero narratives to life.
This styling technique works particularly well for children’s birthdays, themed parties, or as a permanent setup for superhero enthusiasts of any age. The versatility of superhero themes allows for adaptation to any season, though the bold color schemes tend to energize spaces during darker winter months. The style seamlessly integrates with modern, contemporary, or eclectic room designs, making it adaptable to various interior aesthetics while maintaining its distinctive character.
Essential Components:
- Superhero-themed duvet cover or comforter
- Coordinating pillowcases and shams
- Solid color fitted and flat sheets
- Character throw pillows
- Superhero logo cushions
- Cape-inspired throw blanket
- Character-themed bed skirt
- Decorative bunting or banners
- LED strip lights
- Superhero wall decals
- Comic book art prints
- Themed storage boxes or bins
- Double-sided tape
- Command hooks
- Safety pins
How to Achieve This Look
Begin by selecting a primary superhero theme and corresponding color palette. Classic combinations include Superman’s red and blue, Spider-Man’s red and navy, or Batman’s black and yellow. Layer the bed with a fitted sheet in a neutral tone, followed by the themed duvet cover or comforter. Ensure the main character or logo is centered and clearly visible when the bed is fully made.
Create visual hierarchy by arranging pillows from largest to smallest, starting at the headboard. Place solid-colored pillows at the back, followed by themed shams and character cushions in front. Incorporate various shapes and sizes to add visual interest while maintaining the superhero motif. Position a cape-inspired throw blanket draped asymmetrically across the foot of the bed, suggesting movement and action.
Enhance the ambient atmosphere with strategic lighting placement. Install LED strip lights behind the headboard or under the bed frame to create a subtle glow reminiscent of cityscape backgrounds. Add wall decals and artwork at varying heights around the bed to create a comic book panel effect. When photographing the setup, capture angles that showcase the dynamic arrangement and emphasize the themed elements while maintaining a balanced composition.
Pro Styling Tips
Keep extra themed pillowcases on hand for quick changes, and use reversible bedding elements to easily transition between different superhero motifs or tone down the theme for everyday use. For smaller rooms, focus on vertical styling with wall-mounted elements to maximize floor space while maintaining impact.
Consider incorporating storage solutions that double as decor pieces, such as comic book storage boxes or themed toy bins, to maintain organization while complementing the overall aesthetic. To preserve the look’s integrity during daily use, secure decorative elements with damage-free mounting solutions and implement a simple morning routine for quick touch-ups.
Rainbow Birthday Banner Bed Design
A Rainbow Birthday Banner bed design transforms an ordinary bedroom into a vibrant celebration space by incorporating cascading colors and festive elements that create an eye-catching focal point. The playful arrangement of rainbow-hued fabric banners suspended above the bed, combined with coordinating bedding layers, creates a magical birthday atmosphere that delights both children and adults alike.
This cheerful styling technique works particularly well for birthday celebrations throughout the year and can be adapted to complement any existing bedroom décor. Perfect for documenting special birthday moments, the rainbow design photographs beautifully and creates an Instagram-worthy backdrop for birthday morning surprises or gift-opening sessions. The style is especially suited for modern or eclectic bedroom settings where bold colors and whimsical elements are welcome.
Essential Components:
- White or neutral base bedding set
- Rainbow-colored throw pillows
- Fabric or paper birthday banner
- String lights
- Command hooks or mounting hardware
- Colorful bed sheets
- Birthday-themed throw blanket
- Rainbow tassel garland
- Balloon bouquet
- Decorative ribbons
- Safety pins or clips
- Ladder or step stool
How to Achieve This Look
Begin by preparing the bed with crisp white sheets as your canvas, creating a clean backdrop that allows the rainbow elements to pop. Layer the bed with a white duvet or comforter, folding it back slightly at the top to create dimension and reveal complementary sheet colors underneath.
Install the rainbow banner above the bed using command hooks or existing mounting points. Position the banner so it creates a gentle arc or wave effect, ensuring it’s centered above the headboard. Add string lights behind the banner for an enchanting glow, weaving them carefully to avoid visible cords.
Build the color story from the bottom up, starting with larger pieces like the throw blanket at the foot of the bed. Arrange throw pillows in rainbow order from red to violet, mixing different sizes and textures while maintaining the color progression. Position smaller decorative elements like balloon bouquets and ribbon accents to fill any gaps and create balance.
Pro Styling Tips
For maximum impact, stick to a true rainbow color palette rather than pastel variations, and consider using metallic accents like gold or silver to add sophistication. Scale the banner and decorations according to room size – smaller rooms benefit from a more contained display, while larger spaces can handle grander installations.
To maintain the look throughout birthday celebrations, secure all hanging elements firmly and keep backup balloons inflated for quick replacements. Consider creating a semi-permanent mounting system if you frequently style birthday celebrations, using discrete hooks that can be easily hidden when not in use.
Starlit Birthday Night Display
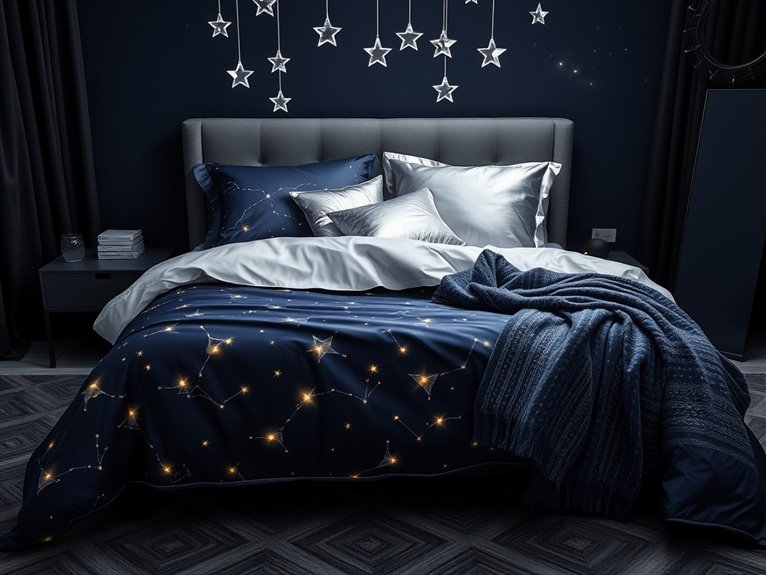
Transform an ordinary bed into a magical nighttime wonderland with a mesmerizing constellation of twinkling lights and celestial-inspired elements. This enchanting bed styling technique creates an ethereal atmosphere by combining soft, dreamy textures with strategic lighting placement, making the bed appear to float in a sea of stars.
The layered approach incorporates both ambient and focused lighting elements that work together to create depth and visual interest. Perfect for winter birthdays or space-themed celebrations, this styling technique works particularly well in contemporary or minimalist bedrooms with darker wall colors that enhance the lighting effects.
The versatile design can be adapted for any age group by adjusting the sophistication of the decorative elements and color palette. This display is especially impactful during evening celebrations and creates stunning photo opportunities.
Essential Components:
- Navy or dark-colored fitted sheet
- White or silver top sheet
- Constellation-printed duvet cover
- Micro LED string lights (2-3 sets)
- Star-shaped throw pillows
- Metallic accent pillows
- Sheer fabric overlay
- Battery-operated hanging stars
- Command hooks or removable adhesive strips
- Light dimmer switch
- Silver or gold metallic garland
- Star-shaped light projector
- Extension cords
- Dark blue or black throw blanket
How to Achieve This Look
Begin by making the bed with the dark-colored fitted sheet as your base, followed by the white or silver top sheet. Layer the constellation-printed duvet cover, allowing it to drape naturally while maintaining crisp corners.
Create depth by folding the top portion of the duvet back approximately 18 inches to reveal the contrasting sheets beneath. Weave the micro LED lights between the layers, starting from the headboard and working toward the foot of the bed.
Position the battery packs discreetly under pillows or behind the headboard. Install hanging stars at varying heights above the bed using command hooks, creating a three-dimensional stellar effect. The sheer fabric overlay should be draped diagonally across the bed, creating gentle ripples that catch and diffuse the light.
For color combinations, stick to deep blues, silvers, and whites as your primary palette, with optional touches of gold or copper for warmth. Position the star projector to cast moving patterns on the ceiling and upper walls. When photographing, use long exposure settings to capture the full luminosity of the lights, and experiment with different angles to showcase the dimensional aspects of the display.
Pro Styling Tips
Position a mirror strategically to reflect the lights and create the illusion of infinite stars, and use dark bedding with a slight sheen to enhance the sparkle effect.
For smaller rooms, focus the display on the bed itself rather than extending too far onto the walls, and consider using fewer, but larger, star elements. During regular use, install the lights on a timer system for easy activation, and keep the sheer overlay secured with discrete clips to prevent shifting.
For summer adaptations, replace heavy fabrics with lighter materials and incorporate glow-in-the-dark elements that create magic even without the lights turned on.
Confetti and Streamers Celebration Setup
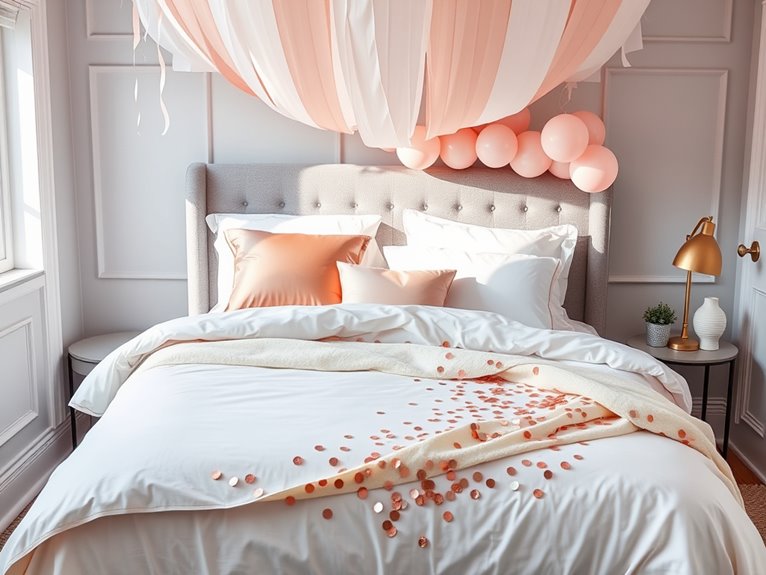
The Confetti and Streamers bed styling technique transforms an ordinary bedroom into a vibrant celebration space by creating layers of festive elements that cascade across the bedding. This whimsical design combines metallic accents, colorful fabric elements, and strategically placed party decorations to create an eye-catching focal point that captures the joyful spirit of birthday celebrations.
Perfect for both children’s and adult birthday celebrations, this styling approach works particularly well in contemporary or eclectic bedroom settings. The versatility of this design allows it to be adapted for any season, though it’s especially popular during spring and summer when bright colors naturally complement the environment. The technique creates an excellent backdrop for birthday morning photos and can be easily modified to match any color scheme or party theme.
Essential Components:
- Crisp white base sheets
- Solid color duvet cover
- 2-3 decorative pillowcases
- Lightweight throw blanket
- Metallic or iridescent confetti
- Tissue paper streamers
- Balloon garland
- Clear fishing line
- Removable adhesive hooks
- Scissors
- Safety pins
- Lint roller
How to Achieve This Look
Begin by making the bed with crisp white sheets as your canvas, pulling them taut to create clean lines. Layer with a solid-colored duvet cover in the celebration’s primary color, folding the top portion back to create dimension. Position decorative pillows in coordinating shades at the headboard, arranging them in descending height order.
Create the streamer canopy by securing removable adhesive hooks to the ceiling or headboard. Drape tissue paper streamers in alternating colors from the hooks, allowing them to cascade naturally onto the bed’s surface. Twist some streamers gently to create spiral effects, while leaving others to flow freely for visual variety.
Install the balloon garland along the headboard or wall, incorporating metallic balloons among solid colors for added sparkle. Strategically scatter confetti across the duvet, concentrating placement near the foot of the bed and creating a gradient effect that appears to “float” upward. For photos, ensure natural light hits the metallic elements to capture maximum sparkle, and shoot from multiple angles to showcase the dimensional quality of the design.
Pro Styling Tips
Create a more sophisticated look by limiting the color palette to three coordinating shades plus metallic accents, and consider using larger-scale confetti pieces for easier cleanup. For smaller rooms, focus the decorative elements on the bed itself rather than extending them to the surrounding space, and use vertical styling to maximize impact without overwhelming the room.
Keep a lint roller handy for quick confetti cleanup, and consider placing a thin clear plastic sheet under the visible bedding layers to make post-celebration cleanup more manageable while protecting the mattress from wayward confetti pieces.
Birthday Present-Wrapped Headboard
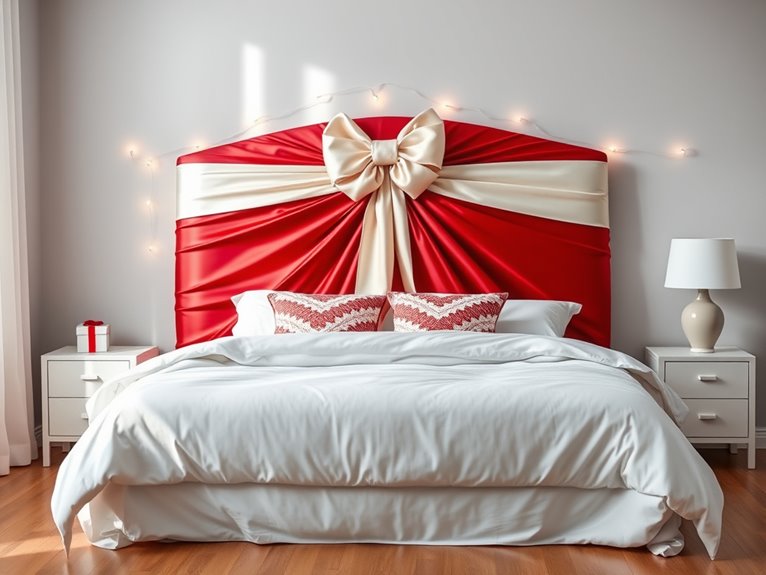
The present-wrapped headboard transforms an ordinary bed into a whimsical celebration centerpiece by creating the illusion of a giant gift waiting to be unwrapped. This eye-catching design features crisp fabric wrapping around the headboard with precise folds and creases, complemented by oversized decorative ribbons and a show-stopping bow, instantly elevating the bedroom into a festive space that captures birthday excitement.
This styling technique works particularly well for children’s birthdays, guest rooms during special occasions, or anyone wanting to create an unforgettable birthday morning surprise. The design is most effective when implemented in contemporary or transitional bedroom styles where the dramatic presentation won’t clash with existing decor. While perfect for birthdays, this look can be adapted for any gift-giving celebration throughout the year by adjusting the color scheme and ribbon styles.
Essential Components:
- Solid-colored fabric panels (wrapping material)
- Wide decorative ribbon
- Extra-large bow or bow-making materials
- Adhesive mounting strips
- Straight pins or safety pins
- Scissors
- Measuring tape
- Iron and ironing board
- Basic headboard
- Coordinating bedding set
- Accent pillows
- String lights (optional)
- Birthday-themed accessories
How to Achieve This Look
Begin by selecting a fabric that mimics gift wrap in texture and sheen, ensuring it’s wide enough to cover the entire headboard with extra allowance for folding. Press the fabric thoroughly to remove any wrinkles, as these will detract from the polished gift-wrapped appearance. Measure and cut the fabric precisely, allowing extra material for clean edges and secure attachment.
Wrap the headboard as you’d a present, creating crisp corners and neat folds. Secure the fabric using adhesive mounting strips for a damage-free installation, placing them strategically to prevent sagging. Add the ribbon next, measuring carefully to ensure symmetrical placement and creating perfectly straight lines across the surface. The ribbon should be proportional to the headboard size – typically 4-6 inches wide for maximum impact.
For color combinations, consider classic gift-wrap pairings like silver with red ribbon, white with gold accents, or pink with white ribbon. Metallic elements add sophistication, while bright, contrasting colors create a more playful aesthetic. When photographing the finished design, capture angles that highlight the three-dimensional quality of the wrapping and bow, using soft lighting to emphasize the texture and sheen of the materials.
Pro Styling Tips:
For easier maintenance and longevity, create a removable slipcover-style wrapper that slides over the headboard rather than attaching directly to it. This allows for simple cleaning and storage when not in use.
Scale the bow and ribbon size according to room dimensions – larger rooms can handle more dramatic proportions while smaller spaces need a more subtle approach. Consider using wrinkle-resistant fabrics and securing loose elements with hidden stitches to maintain the pristine look through extended display periods.
For daily use, ensure all attachments are secure enough to withstand regular contact and movement.
Magical Birthday Tea Party Bed

Transform an ordinary bed into an enchanting tea party wonderland with whimsical details and storybook charm. This playful yet sophisticated styling technique combines the elegance of traditional tea parties with magical birthday elements, featuring delicate pastels, metallic accents, and layers of soft textures that create an inviting celebration space perfect for birthday photos and memorable celebrations.
This styling approach works particularly well for spring and summer birthdays, though it can be adapted year-round for special occasions. The look suits both classic and contemporary bedroom designs, especially those with light-colored walls or feminine touches. It’s ideal for children’s birthday celebrations, themed photoshoots, or creating a special morning surprise for anyone who appreciates vintage charm and magical details.
Essential Components:
- White or pastel base sheet set
- Scalloped or lace-trimmed duvet cover
- 4-6 decorative pillows in varying sizes
- Tulle bed skirt
- Gold or silver metallic throw
- Tea party service set
- Battery-operated fairy lights
- Small cake stand
- Artificial flowers and greenery
- Ribbon in coordinating colors
- Decorative teacups and saucers
- Small birthday banner
- Soft throw blankets
- Paper butterflies or fabric flowers
How to Achieve This Look
Begin by creating a clean foundation with crisp white sheets and a pastel-toned duvet cover. Layer the bed with a tulle bed skirt, allowing it to pool slightly at the corners for an ethereal effect. Add body to the arrangement by placing Euro shams at the back, followed by standard pillows and decorative cushions in graduated sizes, incorporating different textures and complementary patterns.
Position the tea service elements strategically across the bed, creating small vignettes. Place the cake stand slightly off-center, surrounded by carefully arranged teacups and saucers. Weave fairy lights through the display, ensuring they’re hidden during daylight but will create a magical glow for evening celebrations. Drape the metallic throw diagonally across one corner, allowing it to cascade naturally.
For color combinations, focus on soft pastels like blush pink, mint green, and lavender, accented with gold or silver metallics. Create depth by incorporating different shades within the same color family. When photographing, capture both wide shots to show the full magical scene and close-ups of carefully curated details. Natural lighting works best, supplemented by the subtle glow of fairy lights.
Pro Styling Tips
Consider using a fitted sheet one size larger than your mattress to achieve perfectly smooth corners without constant readjustment. For smaller rooms, focus the tea party elements on one corner of the bed rather than spreading them across the entire surface. Keep fairy lights and delicate decorations stored in labeled boxes for quick setup when needed, and consider using removable adhesive dots to secure certain elements that might shift during use.
For daily practicality, designate a few key pieces that can remain as permanent decor while storing the more elaborate elements for special occasions.
Birthday Character-Inspired Sleep Space
A character-themed birthday bed transforms an ordinary sleeping space into a magical celebration zone that captures a child’s imagination and favorite fictional friends. The visual appeal comes from the purposeful layering of character motifs, coordinated colors, and celebratory elements that create an immersive experience while maintaining a cohesive, styled look rather than a chaotic mix of party decorations.
This styling technique works particularly well for special occasions like birthdays and sleepovers, offering a temporary but impactful room transformation that can be easily dismantled after the celebration. While perfect for children’s rooms year-round, it’s especially suited for birthday morning surprises and photo opportunities, working with any bedroom style by incorporating character elements that complement the existing color scheme.
Essential Components:
- Character-themed duvet cover or comforter
- Coordinating fitted and flat sheets
- Character pillowcases
- Decorative throw pillows
- Birthday banner or garland
- Character plush toys
- LED string lights
- Balloon bouquet
- Matching throw blanket
- Birthday number cushion
- Coordinating bed skirt
- Double-sided tape
- Command hooks
- Safety pins
How to Achieve This Look
Begin by creating a solid foundation with the character-themed bedding set, ensuring the fitted sheet is tucked tightly and the duvet is evenly distributed. Layer the flat sheet with a decorative fold at the top, allowing the character pattern to peek through strategically.
Position the main character-themed pillows against the headboard, arranging them in descending size order. Add depth and personality by incorporating throw pillows featuring complementary colors from the character’s palette.
Position plush toys of the featured character at various heights, creating an animated scene that tells a story. Install string lights behind the headboard or weave them through the bed frame to add a magical glow that enhances the character’s world.
Create a celebration focal point by hanging a birthday banner above the bed and attaching balloon bouquets to the bedposts or headboard. Ensure the balloons are secured at varying heights to create visual interest without overwhelming the character theme. For color coordination, select balloon colors that match both the character scheme and the room’s existing palette.
Pro Styling Tips
For a quick transformation, keep a “celebration kit” with command hooks pre-marked for banner placement and categorize character items by color scheme for easy mixing and matching. Scale the theme according to room size by adjusting the number of decorative elements – fewer, larger pieces for small spaces and multiple coordinated vignettes for larger rooms.
To maintain the look throughout the celebration, secure plush toys with hidden safety pins and use double-sided tape for banners and lightweight decorations, making it easy to remove without damaging walls or bedding.